Every summer, my husband and I plan a couple of family camping trips to the Tahoe National Forest, a place we have been returning to for more than 15 years. Our style of camping is the primitive car variety. We like the luxury of packing up our four-wheel-drive truck and pulling right into the campsite but still deep enough into the wilderness to distance us from other campers. I am not one to hike into the wilderness with a full backpack and here’s why: I couldn’t live without my giant cooler. I am a bit of a nut when it comes to camping trip food. I plan exactly what my husband, my young son, and I will eat hour by hour, and I meticulously list every food item, condiment, drink, tool, and utensil we’ll need. A lot of preparation goes into planning these meals and snacks. I wouldn’t think of shoving everything into the cooler with a few of bags of ice. I’m sure it would still be fine and we would eat well, but I am too much invested in the food experience. I enjoy nudging out on little details like putting a paper bag of dry ice in the bottom of the cooler so the regular ice stays frozen all weekend, or save little jars and bottles and filling them with condiments and cooking oil so I don’t have to pack the big bottles, or using my FoodSaver to seal marinated meats so the meat juices don’t leak and ruin the ice for my five o’clock Jack and Coke. I pack my cooler with the focus of a tournament chess player and I am proud of the result. Here’s how I do it:
The cooler: We have two coolers, a 100-quart capacity (17 × 17 × 33 inches), which we use for trips longer than four days, and a 48-quart capacity (15 × 15 × 22 inches), which we use for weekend trips.
Dry ice: I buy a couple pounds of dry ice from an industrial gas supplier because I can buy it by weight, no minimum amount. I found my supplier through this website: www.dryicedirectory.com. The night before we leave, I go there with my empty cooler and a brown paper shopping bag. After few scoops of dry ice goes into the bag (I’ll get 3-4 pounds for the larger cooler and about 1 pound for the smaller one), I carefully fold up the bag and pop it into the cooler. Dry ice is not safe to handle with your bare hands so it is a good idea to keep it contained in a breathable material like paper. The dry ice will evaporate by the end of the trip.
Cubed ice: If we are bringing the large cooler, I take four bags of ice: two for keeping food cold, one for drinks, and one for backup. For the small cooler, I take two bags of ice: one for food and one for drinks.
FoodSaver: I marinate meat and poultry and seal them separately in the FoodSaver. This gadget vacuum-packs food in hermetically sealed plastic bags that are airtight. There is no chance of cross-contamination, and if the ice happens to melt or something spills in the cooler, the meat will be safe in these bags. Plus the packets are flat, so they don’t take up valuable square footage in the cooler. If you don’t have a FoodSaver, resealable plastic bags work well too. As a safety measure, I would put all the individual packets together in a larger bag.
Little jars: I save glass and plastic jelly and condiment jars, the ones I get from hotels and airplanes. I fill them with ketchup, cooking oil, mustard, mayonnaise, and barbeque sauce. It’s another space-saving trick.
Square plastic containers: I use these stackable containers to hold my jars of condiments, and to organize the produce, cheese, and cold cuts. The containers serve as drawers in the cooler and keep everything in order, dry, and off the ice.
Drinks: I transfer milk and juice to smaller containers. We wouldn’t drink a whole carton of milk or orange juice, so I only take what we need in Mason jars or metal or plastic water jugs.
—Julia Lee
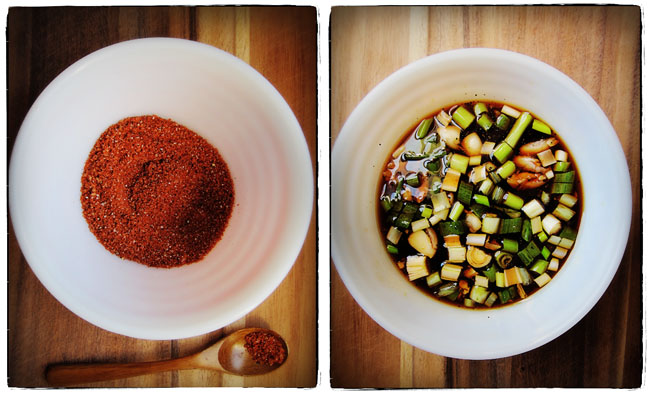
RIB RUB
We can’t go on a family camping trip without these barbecued ribs. Here’s how we make it. A generous coating of the rub goes on both sides of a rack of baby back ribs. Wrap the ribs in a few layers of heavy-duty foil and cook the packet on a low, glowing fire for a few hours, turning now and then, until the ribs are cooked through but not falling off the bone. Take the ribs out of the foil and pour the delicious cooking juices into a bowl and mix with an equal amount of barbecue sauce. Slather the ribs with the mixture and cook over a medium-low fire until the edges begin to crisp up a bit.
For one full rack of baby back ribs, mix together 3 tablespoons brown sugar, 1 teaspoon salt, 1 teaspoon pimentón (Spanish smoked paprika), 1 teaspoon Hungarian sweet paprika, 1 teaspoon ground New Mexico chile (or other mild chile), ¼ teaspoon granulated garlic and a healthy pinch each of ground black pepper, celery salt, and mustard powder in a small bowl. —Makes about ¼ cup.
KOREAN-STYLE MARINADE
You can use this marinade with just about any kind of meat, but I lean toward chicken thighs and legs, and beef short ribs. The longer the meat marinates the better, so we eat this on the last day of the trip.
Combine 1 cup soy sauce, ½ cup water, ¾ cup mirin (sweet rice wine), 2 tablespoons Asian sesame oil, 1 tablespoon brown sugar, 3–4 crushed cloves garlic, 3–4 crushed slices ginger, 1 coarsely chopped scallion, and ground black pepper to taste in a medium bowl, stirring until the sugar dissolves. —Makes about 2 ½ cups or enough for 1–2 pounds of meat.
SaveSave
SaveSave
SaveSave